 You’re asking this question, because you realize the obvious.
Capturing an intruder on camera is not the same as capturing a wild animal.
Animals will notice that the camera is out of place. But they won’t know what it actually is.
If they keep seeing it there, they will begin to ignore it. In other words: it doesn’t really matter if an animal detects the camera.
But that is obviously not the case for a human intruder. You’ll need to follow a different set of guidelines when hiding a trail camera to capture a human intruder.
Table of Contents
- 1 How To Hide A Trail Cam For Home Security
- 1.1 Materials Needed To Hide A Trail Cam
- 1.2 Tip 1: Hide Your Cam In A Bird House Or Fake Landscaping
- 1.3 Tip 2: Hide Your Cam Somewhere Other Than Eye Level
- 1.4 Tip 3: Consider Increasing Your Cam’s Vantage Point
- 1.5 Tip 4: Use A Smaller Camera
- 1.6 Tip 5: Use The Natural Environment To Hide Your Trail Cam
- 1.7 Tip 6: Camouflage The Cam’s Boxy Appearance
- 1.8 Tip 7: Use A Decoy Or Dummy Camera
- 1.9 Tip 8: Use Wireless Cameras
- 1.10 Tip 9: Place A Camera In External Rooms Or Shadows
- 1.11 Tip 10: Use House Lights To Hide The Camera
- 2 Related Questions
- 3 Trail Cam For Home Security: Final Thoughts
How To Hide A Trail Cam For Home Security
Follow the 10 tips below and your trail cam will be just as effective as an actual home security camera.
Materials Needed To Hide A Trail Cam
Depending on how you choose to hide your trail cam, you might need a few things to start.
- Fake shrubbery or tree trunks
- Hanging basket
- Birdhouse
- Ladder for hard-to-reach places
- Rotted tree stumps
- A hole high up in a tree
Tip 1: Hide Your Cam In A Bird House Or Fake Landscaping
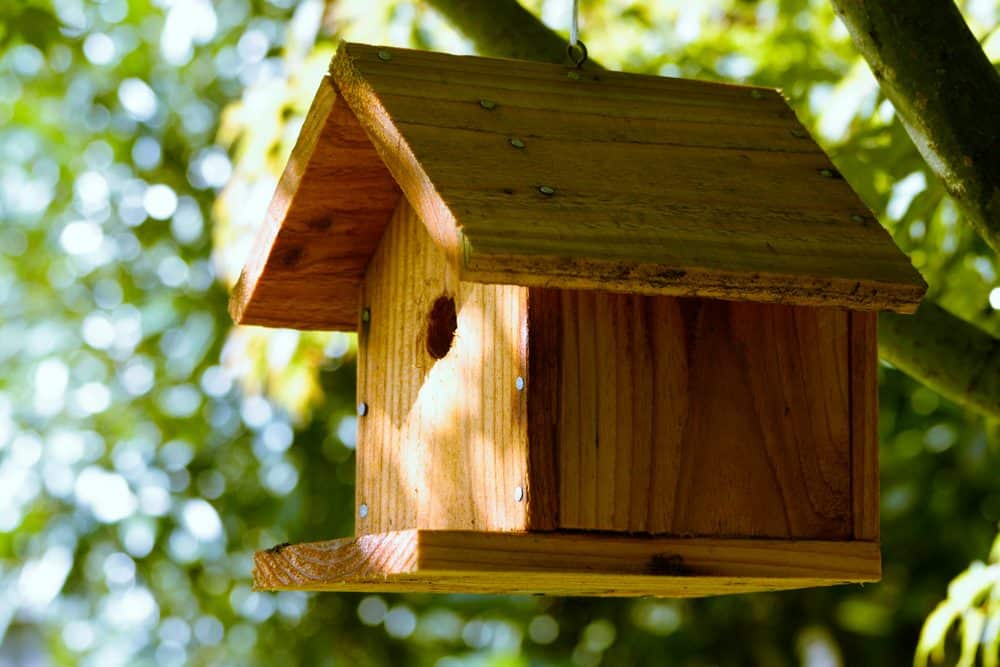
You best bet is generally to hide your camera in plain sight. Enter the bird house. While it may look like you’re inviting birds to stay in your birdhouse, there’s actually a hidden camera inside.
Depending on your camera’s size, you may have to build the house around your camera or engineer it so you can remove the camera from the house.
Either way, the camera will stay hidden in a fun and unique way.
You might also consider engineering a hanging basket for your camera. You can disguise your camera with a few leaves or vines, keeping the lens just out of sight over the basket’s rim.
People use fake tree trunks or shrubbery to create a pretty garden with less work, but they’re also really good at hiding cameras. You might position the camera inside a fake tree trunk with a hole cut in it, or you can cleverly arrange leaves or shrubs to hide it.
Fake rocks are also reasonably inexpensive and easy to modify. They might not look that real up close, but if you embellish your camera with other artificial landscaping materials, it should look real from far away.
In my experience, it doesn’t matter what materials you use, as long as no one suspects there are cameras around.
Tip 2: Hide Your Cam Somewhere Other Than Eye Level
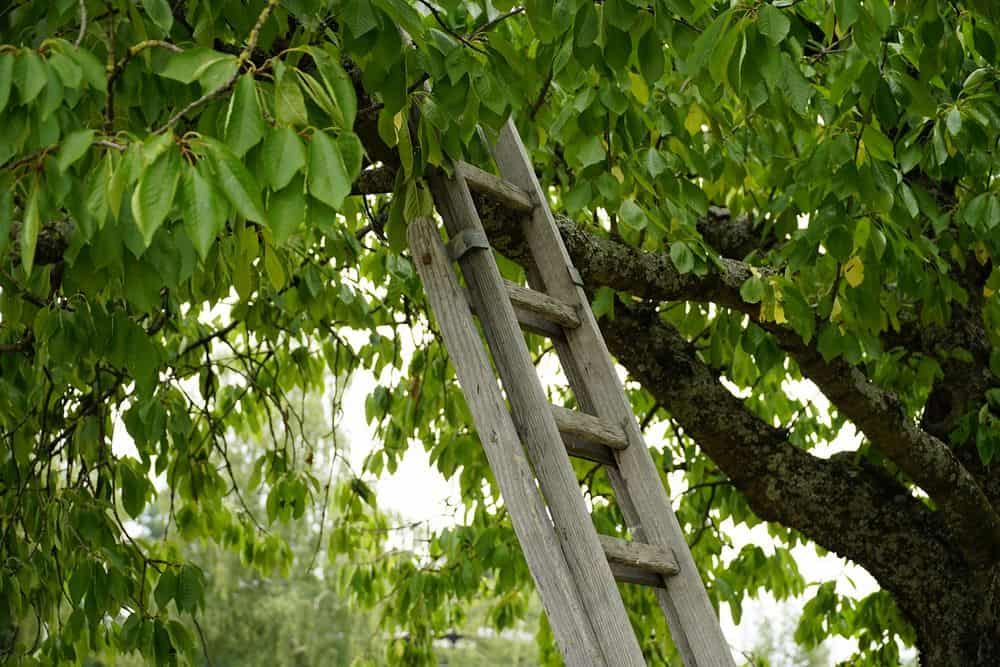
Whether you install your camera on the ground or in a tree, it’s always a good idea to not install the camera at eye level. People are more likely to see the camera if they only have glance to the side, rather than looking up or down.
Installing a camera high up can prove challenging, though. A thief might not be able to steal the camera as easily, but you’ll have to pull out a ladder to reach it. But the added security and stealth make it worth the hassle.
If you install a camera on the ground, make sure to protect it from animals. Don’t place it near any burrows or nests, and do not disturb any animals. I was going to put a camera in my shrubs, but when I discovered a rabbit’s hole nearby, I knew it was best to find another location.
Tip 3: Consider Increasing Your Cam’s Vantage Point

Most people keep their trail cams roughly 10 to 15 feet from where they want to film. Such a distance prevents them from losing the camera in the foliage without people immediately seeing it.
Pushing the camera back also decreases the possibility of accidentally whiting out imagery with a camera flash. The farther away the camera is from the targeted image, the clearer the picture will be. I would try putting the camera about 25 feet from your targeted view.
Play around with your camera’s placement, and see which vantage point you like best. You want to hide your camera, but still be able to easily make out a trespasser’s face on the video.
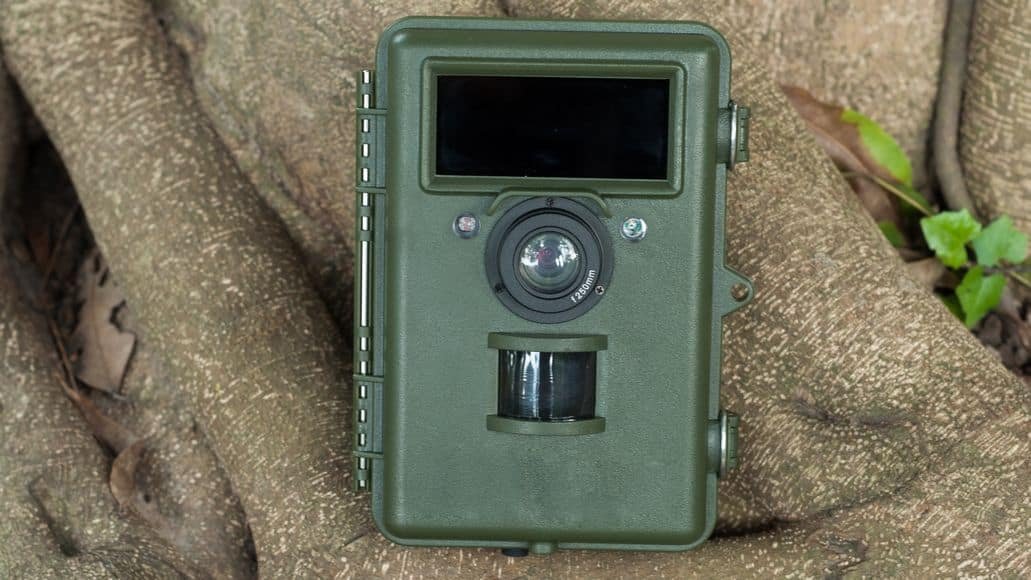
Tip 4: Use A Smaller Camera
Most older trail cams work just fine, but they run on the larger side, making them harder to conceal. Smaller models might be a little more expensive, but if you don’t want to have to get super creative with how you hide a larger camera, they are worth the additional cost.
Larger camera models might also require wiring to work correctly. If you’re able to hide the wires, that’s fine, but it’s one more thing to hide. The fewer accessories and camera bulk you need to hide, the better. Newer and smaller models are always better, if you can afford to pay a bit more.
Tip 5: Use The Natural Environment To Hide Your Trail Cam
Maybe there is a rotted tree stump near where you want to film, or perhaps an old tree with a conveniently-placed hole high up. Such places make excellent hiding spots for trail cams with a little camouflaging, using old leaves or twigs.
Again, make sure you’re not disturbing an animal’s home before placing the camera in these locations.
If you’re placing the camera on a building, a wall with bold or unique patterns can draw attention away from the camera. The viewer might be too busy following the pattern to notice the camera.
Most cameras come with motion detectors, and sometimes, high winds can trigger that alarm (surprising, I know). Make sure the camera is hidden and protected well enough so that no false alarms get triggered.
Tip 6: Camouflage The Cam’s Boxy Appearance
A rule of thumb with camouflaging objects is to eliminate any boxy or straight lines. Most natural-looking things are not straight or perfectly cut, so you’ll want to break up the camera’s unnatural profile.
Some trail cam companies make their cameras in unique shapes, so they blend better into natural environments.
You might even consider painting the camera, so it looks more natural. However, I would not suggest doing this. Changing a camera like that could make returning the item impossible if you have technical issues.
If you don’t have a natural-looking camera, find a hiding place where it won’t protrude or stick out as much. Placing it high up or farther down can help solve this problem. Even then, you might still need some leaves or twigs to hide the camera’s boxy appearance.
Tip 7: Use A Decoy Or Dummy Camera
For extra security, you can place another camera in a prominent location around your home. Except this camera will not have any batteries. It’s purely there to mess with trespassers.
A dummy camera can do one of two things: it will deter people from approaching your home or draw people to mess with the decoy instead.
If they choose to mess with the decoy, you’ll catch it on the real hidden camera. Either way, the actual camera stays safely hidden.
Tip 8: Use Wireless Cameras
Almost everything is wireless now, including trail cams. Without bulky wiring, they are easier to hide and work for virtually any location. They basically have the same pros and cons of wireless security cameras.
I like to use cameras with apps that you can download on your phone to access the camera feed anytime you want. Some cameras will also immediately alert you to an intrusion or abnormal activity using the app.
Without wiring, it’s also harder for intruders to cut off your access to the camera feed. Most wireless cameras are also not that large, allowing you to hide the camera anywhere you like.
Tip 9: Place A Camera In External Rooms Or Shadows
Consider where thieves are most likely to enter your home. In most cases, they’ll enter through an external room, like a greenhouse or a garage.

Both places not only allow easy access to the rest of the house, but they might also contain tools or other items the robber might use for later.
If you have neither of those, consider your best vantage point. If there is a tree or a bush that allows a full view of your home, such a hiding spot would be ideal.
An amateur mistake people make with trail cams (myself included) is not keeping them in the shadows. Even if your camera is well-hidden, it might catch an occasional sun glare.
Be sure to keep the camera in the shadows, so it not only stays hidden but does not catch the sun at any angle or time of day.
Tip 10: Use House Lights To Hide The Camera
I’ve gone on for a while about keeping cameras in shadows or out of sight. However, a trick I recently learned is putting a small camera next to your exterior security lights.
You can direct your external house lights to illuminate your sidewalk or driveway, and position the camera beside or behind the light. That way, your camera view will be brightly lit, and the bright light will make it difficult to see the camera beside it.
Related Questions
Even with all these tips, you might still have some questions regarding how to hide trail cams for home security.
Do All Trail Cameras Have A Flash Feature?
To capture trespassers on film at all hours, most trail cameras do include a flash feature. The question becomes how fast these flashes can effectively take pictures and whether the flash is visible.
Some cameras can take a picture in as little as .2 seconds while capturing high-definition video footage.
Most trail cams have infrared flashes, which take pictures without emitting a bright light. The light itself is invisible to humans, though some animals might see it.
Which Is The Best Direction To Face A Trail Cam?
Whether you are using the trail cam to capture wildlife, or to capture trespassers at your home, the following stays true.
Before, we’ve mentioned that you should not place your camera in direct sunlight, since this can cause glares and overexposure in pictures. However, I’ve found that putting a camera in an open field works fine on cloudy days, but sunny days can glare out any images.
Stark contrasts in light change might also trigger the camera. For instance, a cloud once passed over my camera, and the light changed so fast that I got a picture of the cloudy field.
As a general rule, face the camera northward. Facing the camera in that direction prevents it from staring right into the sun, and the camera can focus on the target subject. You can point your camera to the east or west, but any pictures taken at sunrise or sunset could be hazy or overexposed.
Do Trail Cameras Make Noise?
Some people might worry about a loud camera shutter spooking an animal or trespasser. Most trail cameras do not make a noise loud enough to distract or scare anyone. They might make a small click when they take a picture, but you would have to listen very hard to hear it well.
How Far Can A Trail Cam See Or Detect Movement?
A good trail camera can take photos and detect movement at around 100 to 120 feet. However, the flash range is another factor to keep in mind for nighttime detection or photography.
Luckily, most newer trail cams have a similar flash range, at around 100 feet. Older models could only take pictures at about 30 to 50 feet.
Trail Cam For Home Security: Final Thoughts
Using a trail cam for home security can work well, though a real security camera is better. But if you already have a trail cam, or need one anyway, why not?
Follow the tips above when setting up your trail cam to protect your house or mobile home, so you can be sure you are using it to maximum effectiveness.

- Why Is Night Vision Green? (The Surprisingly Simple Reason) - March 21, 2023
- Dash Cam Pros And Cons (Benefits And Drawbacks You Need to Know) - April 16, 2021
- How To Block Audio Recording Devices - April 15, 2021
Leave a Reply